The Manage Store function will help sellers to maximize their business by creating a dedicated professional-looking store for displaying promotional banners and products. Sellers can access the store building functions in Seller Portal that can be managed to promote their business.
Available for Professional and Enterprise members. Please review our Newegg Elite Seller program to learn more about it. To get started with setting up your storefront page follow the steps below.
Available platforms: Newegg.com, Newegg.ca
Steps:
- Set Banner
- Set Categories
- Set Featured Items
- Set Customized HTML (Optional)
- Set Navigation Top Menu (Optional)
- Complete the Setup Process
Set Banner
The first step is to add banners on top of the storefront page. A maximum of 9 banners can be added.
Banner image requirement:
-
The dimension must be 1920 x 360 pixels. For the best results on all devices and different views of the browser, please create your banners using the following guidelines:
-
The safe area for the essential content: 1000 x 360 pixels
-
The safe area for text: 900 x 300 pixels
-
-
The file size must be less than 5MB.
-
The file format accepted is JPG, JPEG, or PNG.
Please note: Larger images may result in cropped views on certain devices.
How-To:
- Go to Seller Portal and hover your mouse pointer over the list icon (upper left corner) then select Manage Store > Storefront.

-
Click the ADD NEW IMAGE button to get started.
-
Add a title for the banner. This will be seen above the banner.
-
Click the ADD IMG button to upload your banner image.
-
[Optional] Enter a URL for your banner to link to your preferred landing page.
-
Activate or deactivate the current banner.
-
If you have more than one banner, you can set a priority for each banner. This dictates the order displayed on the storefront page.
-
[Optional] Schedule start and end date/time of banner to list on storefront page.
-
Review uploaded banners. Click the back or forward arrows to review uploaded banners.
-
Click the NEXT button to move to the next section, Set Categories.


Set Categories
In the second step, select available subcategories that will be displayed under the storefront page. Customers are able to navigate the seller’s items under their specific subcategories.
How-To:
-
Select category style (A minimum of 3 columns should be selected). Identify the table size.
-
Select between Category Only or Category and Subcategories then click on the pencil icon to set categories options:
-
Category Only:

-
Category Type:
-
Website Category: Choose a Category from listings. (This can be applied to the section of “Category and Subcategories” as well), the URL link will be auto-generated from your selection.
-
Custom Link: Enter a Title. Input the URL link for a designed landing page in Newegg.com. For example, a link to the direct search result within your listings or a promotional landing page from the Newegg marketing team. (This can be applied to the section of “Category and Subcategories” as well)
-
-
Image URL: Direct image from the product listed in Newegg. Please know the Seller Part# or NE Item# for the image that you will be using beforehand.
-
Priority: Move position by priority.
-
Status: Set to be active (show link) or de-active (don’t show link).
-
-
Category and Subcategories:

-
Click + ADD NEW CHILD CATEGORY to add subcategories under Category.
-
Category Type:
-
Website Category: Click the pencil icon to choose a Category from the store account, the URL link will be auto-generated from the selection.
-
Custom Link: Enter a Title. Input the URL link for a landing page on Newegg.com. For example, a link to the direct search result within your listings or a promotional landing page from the Newegg marketing team.
-
-
Priority: Move position by priority.
-
Status: Set to be active (show link) or de-active (don’t show link).
-
-
-
Enter the information for all required fields then click SUBMIT to continue. (Repeat steps 2 and 3 mentioned above till all categories have been entered)
-
After completing all categories, click the NEXT button to move to the next section, Set Featured Items.


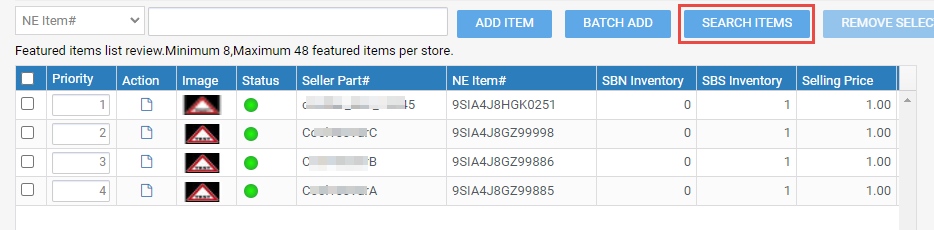
Set Featured Items
The third step is to add featured items to the storefront page. Only the first 30 active featured items will be shown up on the website. If active featured items are less than 5, this section will be invisible
How-To:
- Add your items by selecting either ADD ITEM, BATCH ADD, or SEARCH ITEMS:
- ADD ITEM: (Adding items individually)

- Know the specific item numbers that you will add beforehand (i.e. Seller Part# or NE Item#), and switch the filter’s drop-down menu to match the item number.
- Enter the item number then click the ADD button.
- ADD ITEM BY BATCH: (Batch upload your items)
- Click the ADD ITEM BY BATCH button to get started.

- Click the Download File Template button to download the template needed to upload your items.

- Open the template:
- Instruction sheet review if needed.

- AddItemByBatch sheet you will input your SellerPartsNo and enter the Priority number into the respective fields as instructed then save the file.

- Instruction sheet review if needed.
- Upload the template:

- Click the Browse button and find the file in your local drive, the system will list your items when you have confirmed the file.
- Click the OK button to add the items.
- Click the ADD ITEM BY BATCH button to get started.
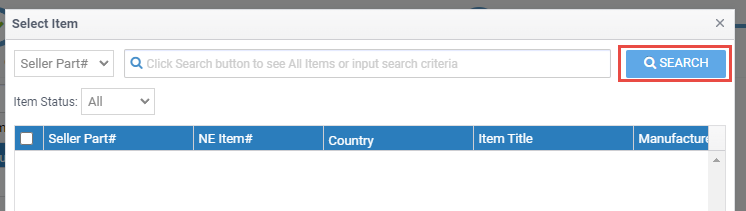
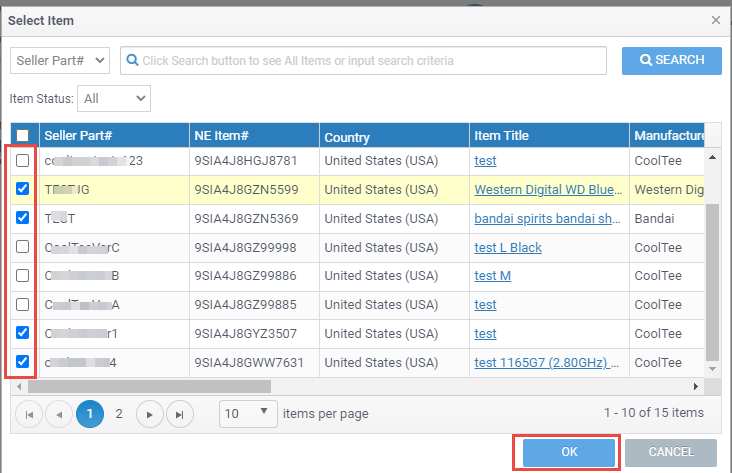
- SEARCH ITEMS: (Search and add your items)
- Click the SEARCH ITEMS button to get started.
- Click the SEARCH button to list all items.
- Click the empty box to select the items then hit the OK button.
- Click the SEARCH ITEMS button to get started.
- ADD ITEM: (Adding items individually)
- Priority: Change the order if needed, enter a new position number then click the REFRESH PRIORITY button to update.
- Action: Review the featured item.
- Click the NEXT button to move to the next section, Set Customized HTML.


Set Customized HTML (Optional)
In the fourth step, sellers may add HTML tags to the storefront page. This step is optional, click the NEXT button to skip it.
How-To:
- Please review what is not allowed and the guidelines.
- Enter the well-formatted message in HTML or upload an image banner or video clip.
- Important! All customized HTML messages or video clips will be reviewed by the Newegg team. The review status will be displayed at the bottom of the section:
- Draft: Saved but not submitted yet.
- Pending: Submitted and waiting for review. It will take up to 1 business days for the review process. If the status has not been updated after 1 business days, please contact our Newegg Marketplace Support team for assistance.
- Approved: Reviewed and approved. Currently, live on the storefront page.
- Declined: Content does not meet Newegg’s requirement. Please review the requirements and correct them accordingly then submit again.
- Click the NEXT button to move to the next section, Set Navigation Top Menu.

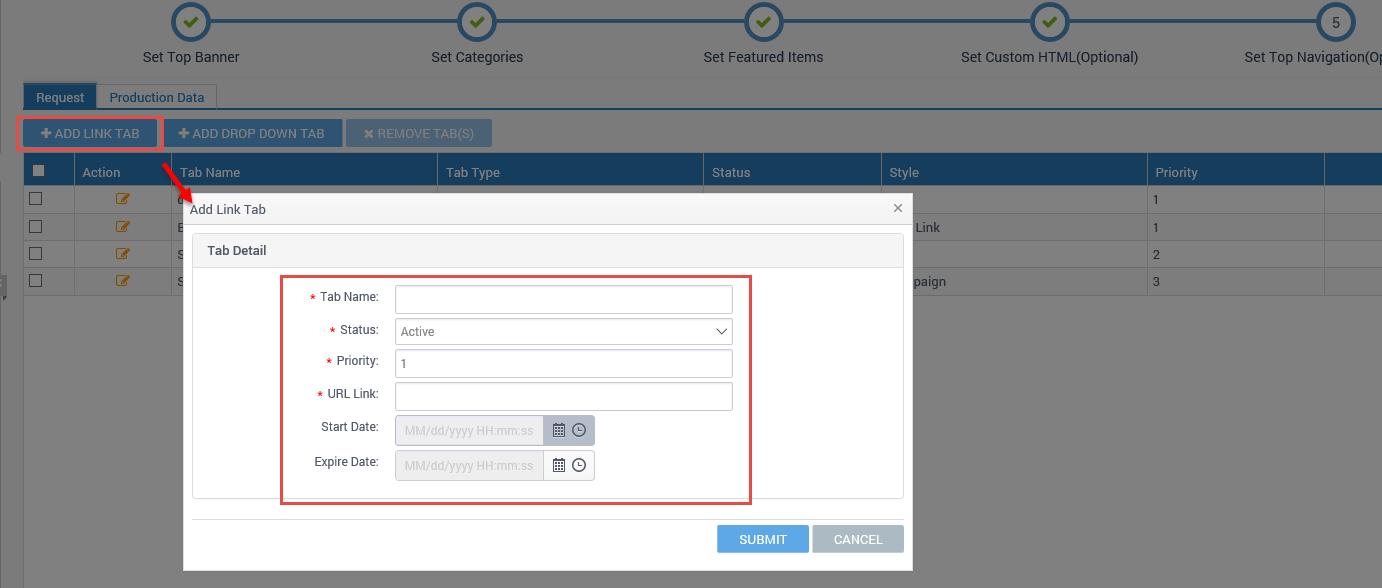
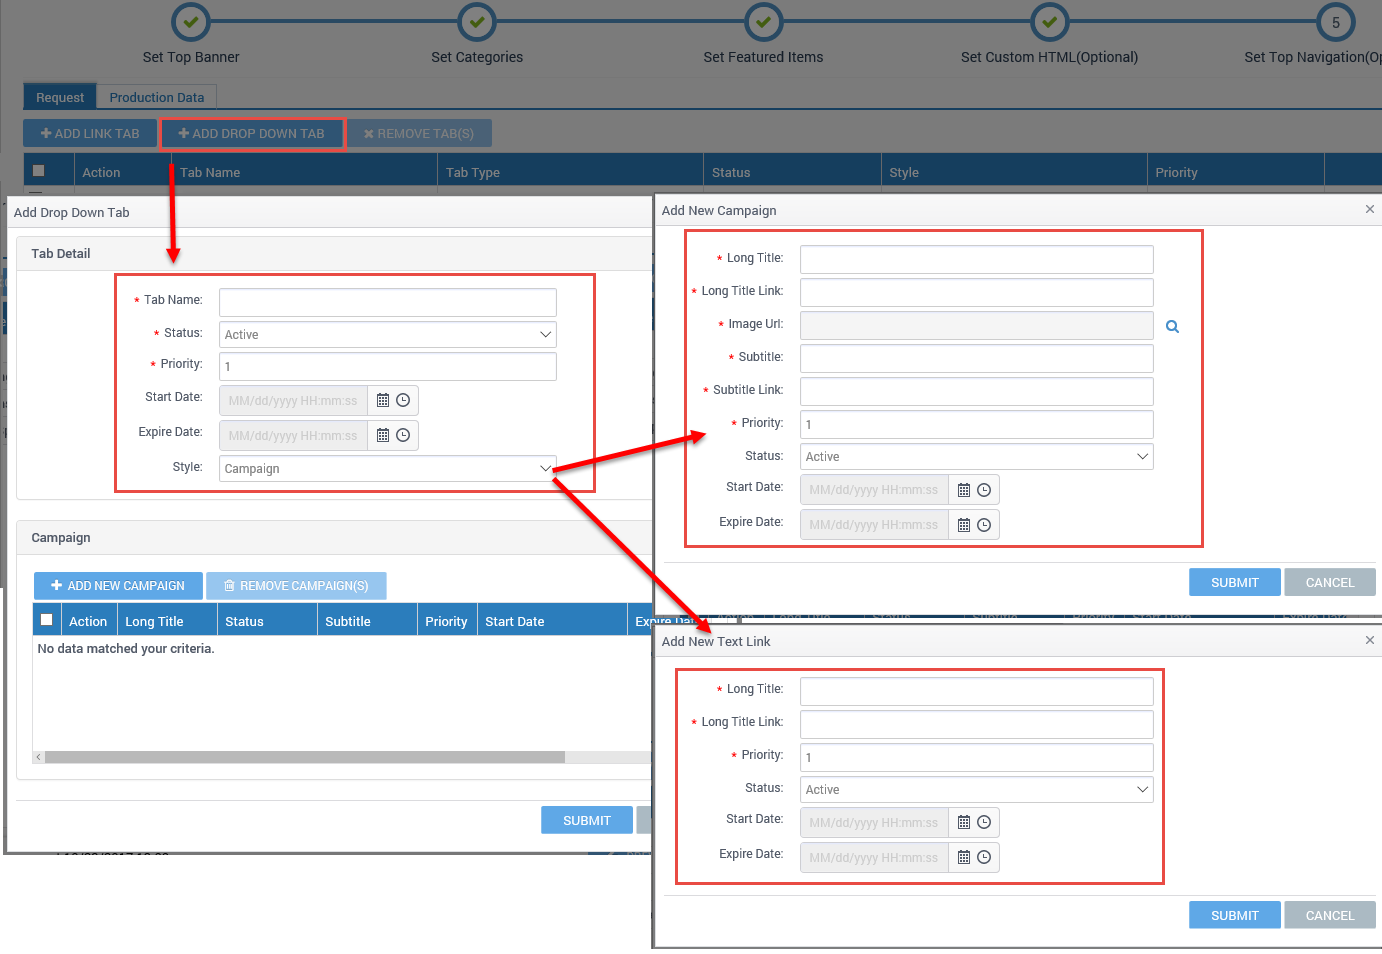
Set Navigation Top Menu (Optional)
In the fifth step, set up the available top navigation menu that will be displayed on the top of the storefront page. There are two options available: direct link and drop-menu with subpages. This step is optional, click the SUBMIT FOR APPROVAL button to skip and complete it.
Please note: After clicking the SUBMIT FOR APPROVAL button all changes to the storefront will be reviewed prior to being published on Newegg’s website. If changes to the storefront page are not reflected after 3 business days, contact our Newegg Marketplace Support team for assistance.
How-To:
- Adding a direct link:
- Click the + ADD LINK TAB button tab to get started.
- Enter the information for all required fields.
- Input the URL link for a designed landing page on Newegg.com.
- Click the SUBMIT button to move forward.
- Adding a drop-menu with subpages:
- Click the + ADD DROP DOWN TAB button to get started.
- Enter the information for all required fields for the Tab Name. Select a Style for the links.
- Campaign: Adds a direct link and sub-link.
- Text Link: Adds a direct link.
- Click the + ADD NEW CAMPAIGN OR +ADD NEW TEXT LINK button depending on the Style chosen.
- Enter the information for all required fields for the drop menu. NOTE:
- Long title and link: Available for text and campaign.
- Subtitle and link: Available for the campaign.
- For long and sub-links, input the URL link for a designed landing page in Newegg.com.
- Image URL: Available for the campaign. Know Seller Part# or NE Item# of the product that will be used for the image.
- Priority: Move position by priority. Available for text and campaign.
- Status: Set to be active (show link) or de-active (don’t show link). Available for text and campaign.
- Click the SUBMIT button to move forward.
- Enter the information for all required fields for the drop menu. NOTE:
- Click the SUBMIT button to complete this setup.


Complete the Setup Process
The last step is to review and submit the storefront page.
How-To:
- Complete the storefront setup with the following options:
- Click the PREVIEW button to verify current configurations or updates.
- Click the SAVE & CLOSE button to save updates as a draft and come back to edit soon before submitting the request.
- Click the SUBMIT FOR APPROVAL button if the setup of your storefront page is completed and ready to go live. Please note:
- All changes to the storefront will be reviewed prior to being published on Newegg’s website. If changes to the storefront page have not been reflected after 3 business days, contact our Newegg Marketplace Support team for assistance.
