The Manage Store function will help sellers maximize their business by creating a dedicated professional-looking store for displaying promotional banners and products. In addition, sellers can access the store building functions in the Seller Portal to promote their business. To set up your storefront page, follow the steps below.
Available platforms: Newegg.com, Newegg.ca
Steps:
Set Navigation Menu
The first step is to set your store’s page navigation and include all applicable subcategories associated with your listings.
How-To:
- Go to Seller Portal and hover your mouse pointer over the list icon (upper left corner) then select Manage Store > Storefront.

Add subcategories to the navigation menu:
-
- Click the drop-down list
- Click on the industry name to collapse the list
- Check the empty boxes to add the subcategory to the navigation menu
- Click anywhere outside of the drop-down list to get out of the selection and add categories
- [Optional] Move or remove subcategory:

- To move a subcategory up or down in the list: Select the subcategory and click the UP button or DOWN button
- To remove a subcategory from the list: Select the subcategory and click the Remove button
- Click the CONTINUE button to move to the next section: Set Banner.
Set Banner
The second step is to add banners on top of the Storefront page. Please note: Only a maximum of 4 banners are allowed.
Banner image requirement:
- The dimension must be 1920 x 360 pixels. For the best results on all devices and different views of the browser, please create your banners using the following guidelines:
- The safe area for the essential content: 1000 x 360 pixels
- The safe area for text: 900 x 300 pixels
- The file size must be less than 5MB.
- The file format accepted is JPG, JPEG, or PNG.
Please note: Larger images may result in cropped views on some devices.
How-To:
- Click the ADD NEW IMAGE button to get started.
- Add a title for the banner. This title will display above the banner.
- Click the ADD IMG button to upload your banner image.
- [Optional] Enter a URL for your banner to link to your preferred landing page.
- Activate or deactivate the current banner.
- If you have more than one banner, you can set a priority for each banner. This priority dictates the order displayed on the storefront page.
- [Optional] Schedule start and end date/time of banner to list on storefront page.
- Review uploaded banners. Click the back or forward arrows to review uploaded banners.
- Click the CONTINUE button to move to the next section, Set Categories.

Set Featured Items
The third step is to add featured items to the storefront page. A minimum of 8 items must be featured, and a maximum of 48 items can be featured.
How-To:
- Add your items by selecting either ADD, ADD ITEM BY BATCH, or SEARCH ITEM:
- ADD: (Adding items individually)

- Know the specific item numbers that you will add beforehand (i.e., Seller Part# or NE Item#), and switch the filter’s drop-down menu to match the item number.
- Enter the item number, then click the ADD button.
- ADD ITEM BY BATCH: (Batch upload your items)
- Click the ADD ITEM BY BATCH button to get started.

- Click the Download File Template button to download the template needed to upload your items.

- Open the template:
- Instruction sheet review if needed.

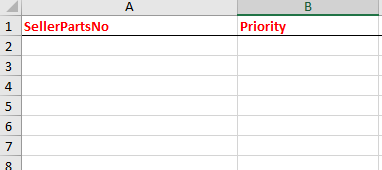
- On the AddItemByBatch sheet, you will input your SellerPartsNo and enter the Priority number into the respective fields as instructed then save the file.

- Instruction sheet review if needed.
- Upload the template:

- Click the Browse button and find the file in your local drive; the system will list your items when you have confirmed the file.
- Click the OK button to add the items.
- Click the ADD ITEM BY BATCH button to get started.
- SEARCH ITEMS: (Search and add your items)
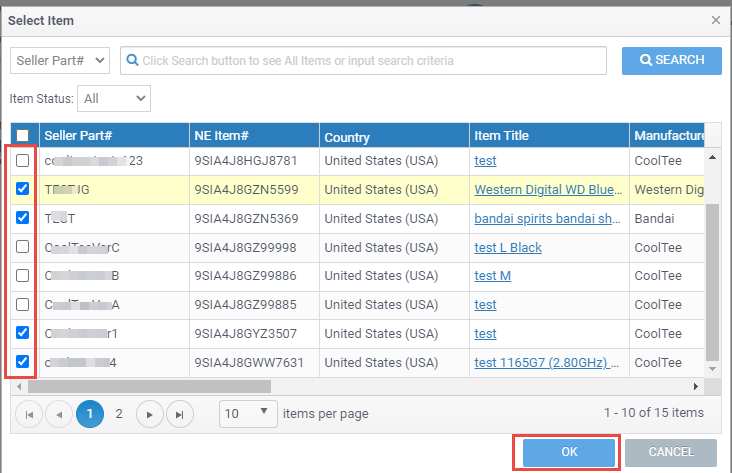
- Click the SEARCH ITEM button to get started.

- Click the SEARCH button to list all items.

- Click the empty box to select the items then hit the OK button.

- Click the SEARCH ITEM button to get started.
- ADD: (Adding items individually)
- Priority: Change the order if needed, enter a new position number, then click the REFRESH PRIORITY button to update.
- Action: Review the featured item.
- Click the SUBMIT button to complete, and your storefront page will take up to 10 minutes to reflect on the site’s front end.


